In this post, I’m going to show you how to easily split a long audio file into shorter separate files using Audacity.
In a previous post, I showed you how to extract mp3 audio from a DVD using VLC. If your DVD was logically segmented into chapters, songs, episodes and so forth, the extraction process converted all the contents of your DVD into a single audio file.
Let me show you how you can easily split that file into logical segments.
Step 1: Download and Install Audacity

Before we get started, you will need to download and install Audacity from audacityteam.org site.
Step 2: Launch Audacity and Import Audio File

To launch Audacity, got to search and type Audacity. Audacity will appear in the search results. Click on it to launch or press the enter key. Then Click on the File menu and scroll down to import. Then click on Audio. Navigate to the folder that contains the file, select the file and click open. Audacity will take a while to import the audio file.
Step 3: Add Labels to your Audio File
We are going to add labels to our audio file and then split the file at the labels. There are a couple of ways you can add labels to your audio. You can manually add labels by first selecting the selection tool. Then, on the track, find where you want to add the label.
Zoom into the track, by pressing the control key and using the scroll wheel on your mouse, then find the position where you want to split the file by listening to the file. You need a label at the start of the file since Audacity will split the file between 2 two labels. The waveform will clearly show you where there are silences in the audio. Silences normally mark a logical end and beginning of content.
You can then use the forward or back allows to move the play head to exactly where you want to split the file. Once you have the play head exactly where you want it, click on the edit menu. Scroll down to labels, and then click on add label at selection. You can also use the ctrl + b shortcut key to add labels at the play head. Find the next section where you want to split the file and repeat.
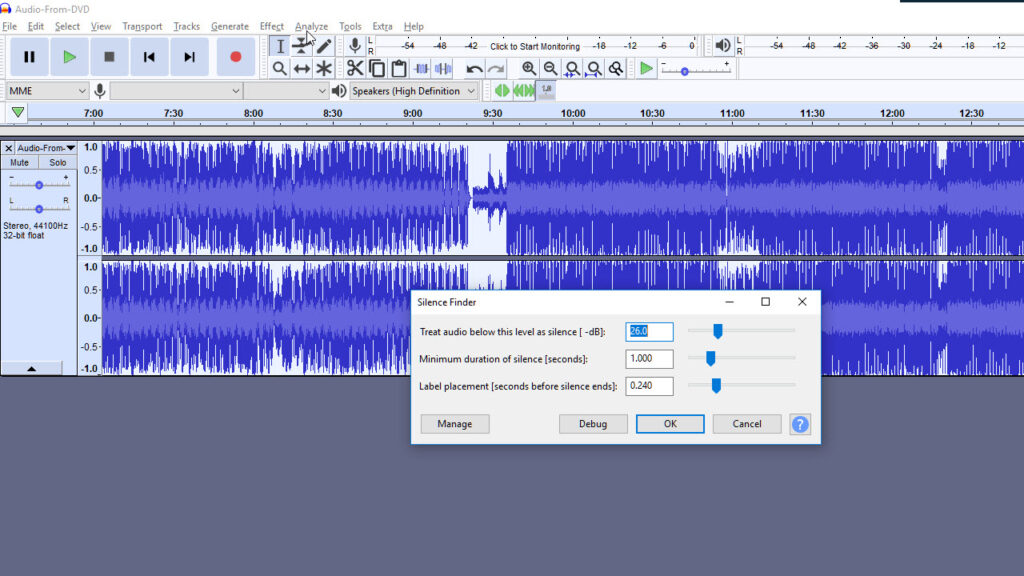
If you ripped music from your DVD, there’s an easier way to add labels to your audio file. Unlike dialogue, you will find silence at the end of each song. And Audacity comes with a silence finder. Click on the track to select it. You can also use ctrl + a to select all the tracks. Then click on Analyze, scroll down and click on silence finder. In the silence finder window, leave all the options at their default values and click okay.
Audacity will find all the silences in the audio and mark them with a label. Then check all the labels and make sure they are in the right position.
Step 4: Export your Audio Files
Now that you are sure all the labels are in the right position, it’s time to export the audio files. Click on the File Menu, then scroll down to export. Then click on Export multiple.
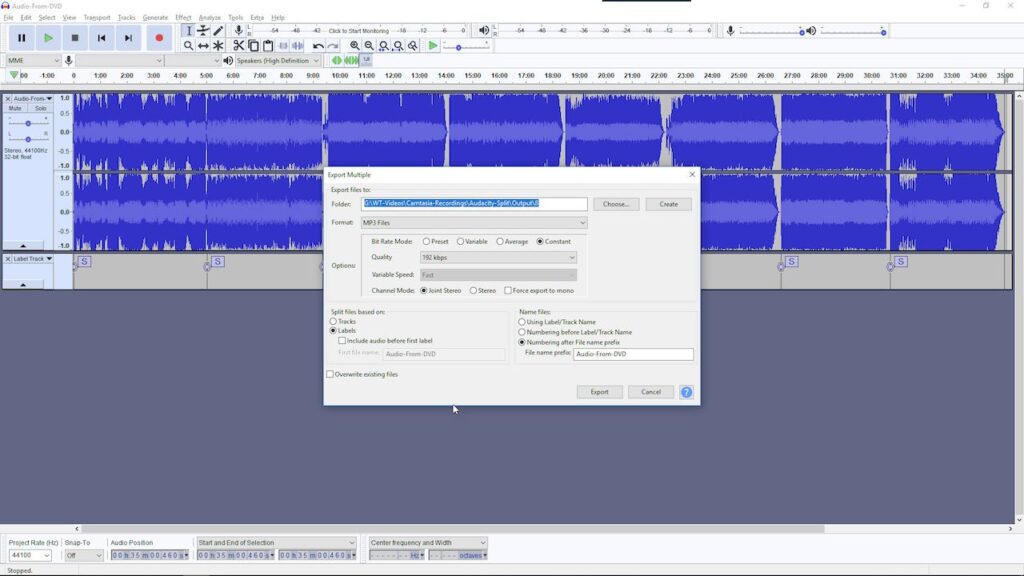
In the Export multiple window that pops up, set your destination folder. Then select the audio format. Select mp3, though you can select any other audio format you wish. Set the bit rate mode to constant. Quality at 192 kbps and then check joint stereo.
Select the split files based on labels. And since you placed a label at the beginning of your audio, leave the include audio before first label checkbox unchecked. Then choose the numbering after file name prefix as my naming style. Then click export.
You get a chance to edit the metadata tags for each file. Leave as is and click ok for each file. Ran through this option for each of the files and then Audacity will begin to export each file.
Once Audacity is done, it will output the names of all the individual files exported and their location.
Here’s a short how-to video:
That’s it for this post. Check out our posts on how to merge mp3 audio files using CMD, and how to extract mp3 audio from mp4 video using VLC. If you have any questions, comments, or suggestions, please post them in the comment section below. Have a great day!
Leave a Reply